Showing posts with label newborning. Show all posts

Tuesday, November 15, 2011

Cuddly Baby Dolls by Mary Golightly - Now on eBay


A baby is sunshine and
moonbeams and more.
Brightening your world
as never before.
~Anonymous

 ~*~
Shopping for a doll lover for the holidays? Better still, shopping for yourself? :-)


Peek at two of my reborn creations now on eBay. No reserve. Super quick, one day handling time. Economy or expedited shipping available.

Lily ~ Formerly, Kaylee, a Limited Edition sculpt by Linda K. Smith

Lily is 19 inches long and weighs approximately 3 pounds.


~*~

Keri ~ Formerly Taffy, a Victoria Reid sculpt

Keri is 17 inches long and weighs approximately 2 pounds.
~*~

If you have any questions about my dolls, please feel free to leave a comment.
Bright Blessings!

"Mary Golightly"
(Trenda Plunkett


Taffy and Kaylee from Secrist Dolls


Saturday, October 1, 2011

Bringing Your Baby Doll to Life - Part 7

Welcome back!

Here's a picture of Kaylee's eyebrows. As you can see, I used a very fine liner brush to apply the color.

I'm planning to use premium blonde mohair for Kaylee's hair, so I wanted her eyebrows to be blonde, too. I used Genesis Yellow Ochre with a touch of Genesis Burnt Umber. For extra control, I like to use Genesis Thinning Medium instead of odorless thinner.

Paint the eyebrows using your choice of Genesis heat set paints and Genesis Thinning Medium.

Bake the head at 265 degrees Fahrenheit or 130 degrees Celsius. Allow it to cool completely before continuing.


P.S. I'm not sure if you can see it in the picture, but before I did the eyebrows, I added some details to the eyelids. They are very subtle. I painted red micro veins on Kaylee's lids with my fine liner brush. After baking the veins, I applied a very thin layer of blue to tint the lids. I baked the head again before applying a bit of thin purple tint to the lids.

~*~

If you are interested in an in depth look at color mixing and reborning, I highly recommend The Art of Reborning II - Painting with Genesis Heat Set Paints. (not an affiliate link)

Bring home one of my precious angels! See Baby Keri's Auction and My Babies on Etsy

Friday, September 30, 2011

Bringing Your Baby Doll to Life - Part 5

Welcome back! Today, I'm sharing pictures of how I painted Kaylee's creases and wrinkles.

Mix your crease and wrinkle paint in one of the wells on your porcelain (or aluminum...no plastic!) palette. I'm using Genesis Heat Set Paints. Darken your blush color mix with some of your Burnt Umber. This will deepen the tone of your paint. Stephanie Sullivan suggests adding a bit of Dioxazine Purple 04 to cool the color.

Mix your crease and wrinkle color on your palette.

I use my 00 round brush to apply this color to the creases and wrinkles. Use a scrubby brush to feather and blend the edges.

Apply crease and wrinkle paint to the inside of the nostrils.

Apply crease and wrinkle paint to the inside of the ears.

Use a scrubby brush to feather the edges of the crease and wrinkle paint.


Apply paint to the creases and wrinkles on the hands and arms.

Apply paint to the creases and wrinkles on the feet and legs.
Bake at 265 degrees Fahrenheit or 130 degrees Celsius. Allow the parts to cool completely before proceeding to the next step.

If you are interested in an in depth look at color mixing and reborning, I highly recommend The Art of Reborning II - Painting with Genesis Heat Set Paints. (not an affiliate link)

Bring home one of my precious angels! See Baby Keri's Auction and My Babies on Etsy

Thursday, September 29, 2011

Bringing Your Baby Doll to Life - Part 4

Welcome back! Today I'm sharing more pictures of Kaylee, my current baby doll in progress. I apologize for the photo quality. I am saving up for a good camera. I hope you still find the posts and photos to be helpful.

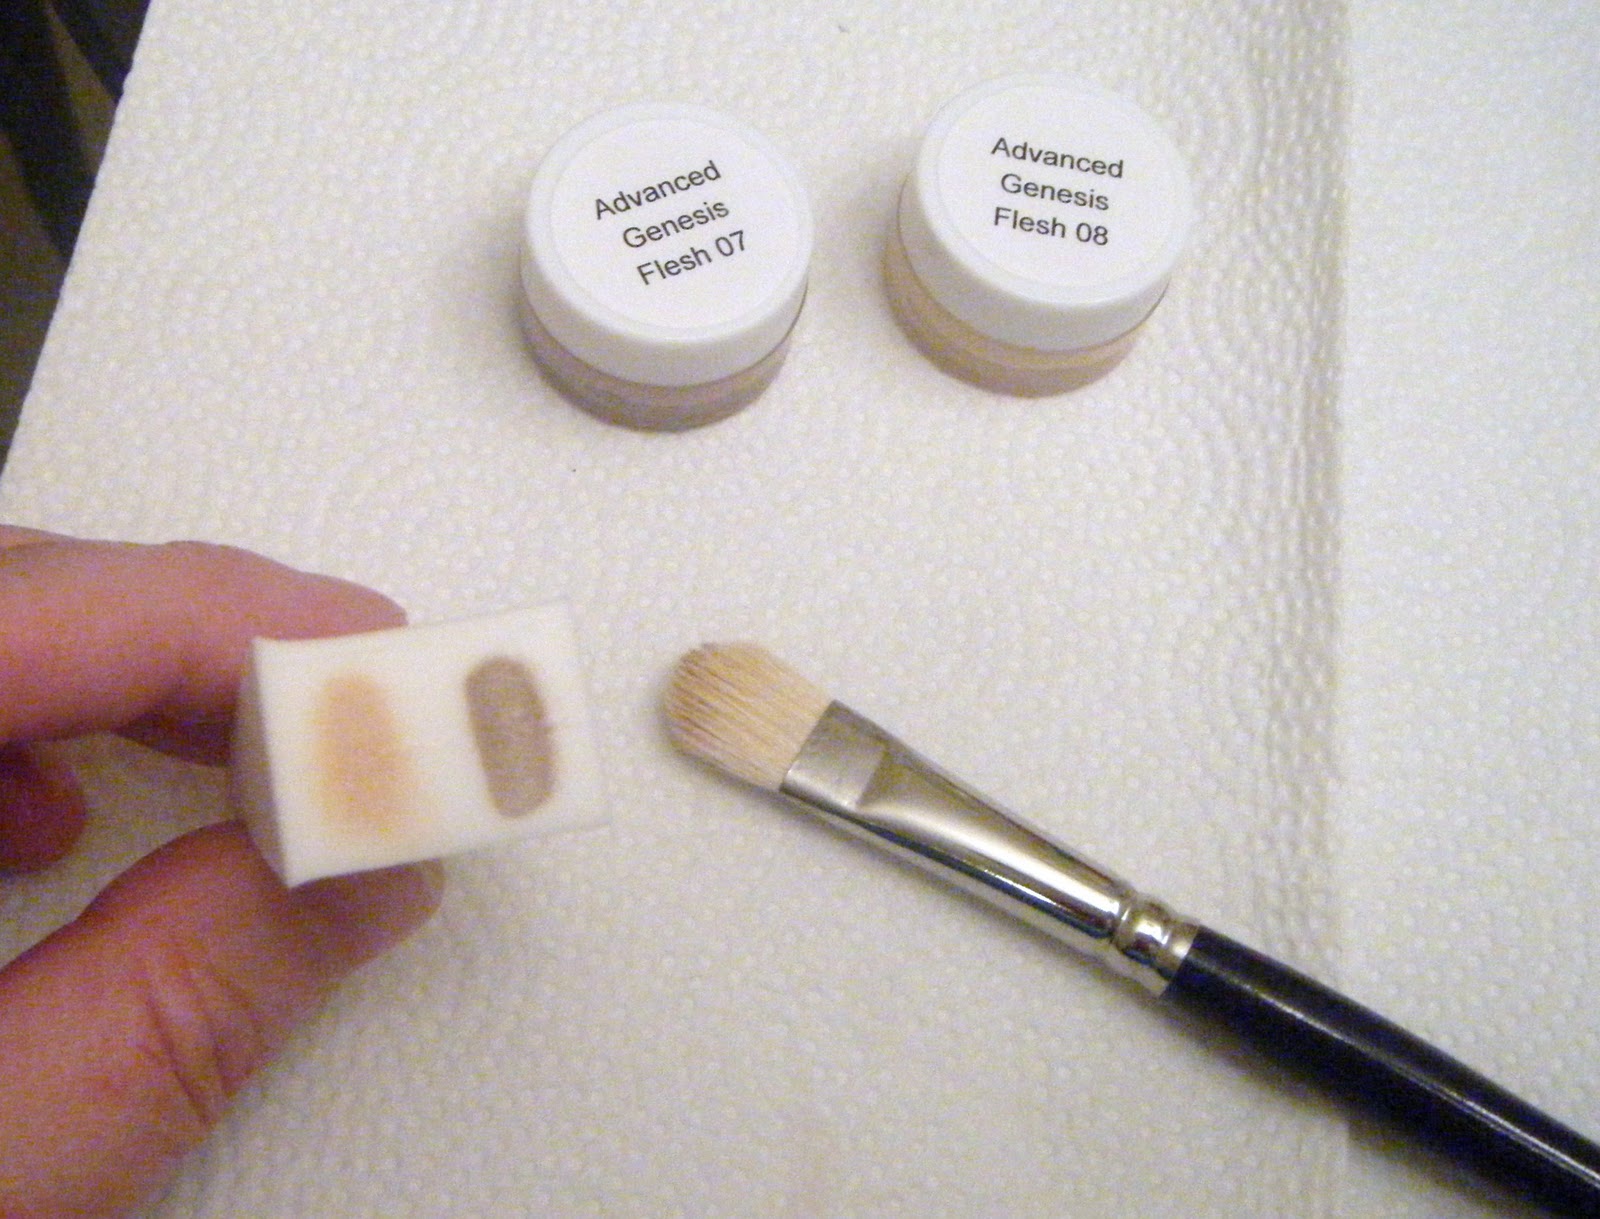
After baking the first blush layer, let the parts cool completely. For the next step, we'll be adding the second layer of foundation paint. Lightly moisten the end of your cosmetic foam wedge with odorless thinner (I use the Mona Lisa brand). With a 1/2 inch Maxine's Mop, apply a dot of Flesh 07 and a dot of Flesh 08 to the sponge.

Genesis Flesh 08 (left) and Flesh 07 (right)

With an up and down pouncing motion, apply the paint to the doll, reloading the sponge when needed. Try not to over-blend the colors.

Apply the second foundation layer using Flesh 07 and Flesh 08.  

Bake the parts at 265 degrees Fahrenheit or 130 degrees Celsius. Allow parts to cool completely before continuing.

Next, we use our blush color mix to apply blushing details to the head and limbs. Look at pictures of real babies to get ideas for blushing your baby doll in a realistic way.

Add blushing details to the head with your Maxine's Mop.

Add blushing details to the limbs with your Maxine's Mop.

Bake the parts at 265 degrees Fahrenheit or 130 degrees Celsius. Allow the parts to cool completely before continuing.

~*~

If you are interested in an in depth look at color mixing and reborning, I highly recommend The Art of Reborning II - Painting with Genesis Heat Set Paints. (not an affiliate link)

Bring home one of my precious angels! See Baby Keri's Auction and My Babies on Etsy

Saturday, September 24, 2011

Bringing Your Baby Doll to Life - Part 1

Over the next several posts, I'll be sharing photographs of Kaylee, as I bring her to life through the wonderful art of reborning (sometimes called newborning).

Kaylee will be 19 inches in length when she is completed. She has 3/4 limbs, which means 3/4 of the arms and legs are vinyl, with the remainder of each limb being a part of the cloth body. I purchased my Kaylee kit directly from Secrist Dolls. Her eyes were pre-inserted since I ordered them at the same time I bought the kit. They are a lovely shade of blue.

Once I've selected the doll kit I wish to reborn, I like to give the head and limbs a gentle bath in warm water with baby shampoo bubbles. I then rinse each part inside and out with warm water and set them on my drying rack. This gentle bath ensures any smudges from handling at the manufacturer are cleared away before I begin painting. I love the scent of baby shampoo, don't you? Brings back memories of when my 12 year old and 9 year old were wee ones.

Washing vinyl head and limbs before painting ensures surface is clean.

Drying rack

Next, I set up my paint palette. I like to use Genesis Heat Set paints. Use a porcelain or aluminum palette when mixing your heat set paints. Plastic palettes will react with the heat set paints, so never use plastic palettes. Use wooden craft sticks to lay out your colors.


For more color mixing and reborn painting guidance, see Secrist's The Art of Newborning II: Painting with Genesis Heat Set Paints (not an affiliate link). Stephanie Sullivan, renowned reborn artist, guides you through the color mixing and painting process. I can't recommend this DVD highly enough!

Using a 00 round brush, apply veining using a very thin mix of Genesis Phthalo Blue 03, Phthalo Green 06, and odorless paint thinner (I use Mona Lisa Brand). Browse pictures of real babies online to get ideas and inspiration for where to paint the veins.
Veining color mix
Apply the veining on the head, arms, and legs. Blot each vein as you go using a clean cosmetic foam wedge sponge. You want the veins to have a barely there appearance.


Veining should be applied lightly to give a natural, barely there appearance.


Genesis heat set paints must be baked at 265 degrees Fahrenheit or 130 degrees Celsius for 8 minutes. I use a dedicated countertop oven for my reborn dolls. I set the oven to the bake setting. I like to use the "stay on" feature on my oven. I use an oven thermometer to ensure the temperature of the oven is accurate. The outside of the oven will get very hot! Use caution to avoid burns and keep the oven in a place out of the reach of children and pets.

Dedicated countertop oven and oven thermometer to ensure correct temperature.

Rather than placing your doll parts directly on the baking pan, first layer fabric napkins to protect the parts from being scorched. Set a timer so the doll parts are baked for exactly 8 minutes. Over-baking will ruin the vinyl.

Once all the parts have been baked, allow them to cool completely before proceeding to the next step.

Up Next: Foundation Layer #1

Bring home one of my precious angels! See Baby Keri's Auction and My Babies on Etsy.

Tuesday, July 26, 2011

Darcy - Sweet Reborn Baby Girl

Meet Darcy, a precious baby girl reborned using Secrist's "Squeaky" kit. She is 19 inches long and is weighted with tiny glass weighting beads. Even though I'm keeping her in my personal collection, I just had to do the proud Momma thing and show her to you.

Doesn't Darcy look adorable all wrapped up in her ducky towel?
I painted Darcy's complexion with Authentic Reborn's Gentle Touch Strawberry Complexion paint set.

Love this little darling? I'd be delighted to create one like her especially for you! Just click on the Etsy Shop link in the right sidebar. In your notes to seller, let me know you'd love a baby reborned from Secrist's "Squeaky" kit. Outfits may vary depending upon what is available to me at the time you place your order.

Friday, July 22, 2011

Welcome!

Welcome to "A Doll is Born," my new blog devoted to my work as a reborn doll artist. I'll share plenty of pictures of each baby doll. Watch each little darling come to life!

Want a sneak peek at one of my reborn doll creations? Meet Sophie, a precious baby girl brought to beautiful life with the "Jordan" kit created from a sculpt by Adrie Stoete Schuiteman.


Bright Blessings!

Mary Golightly